
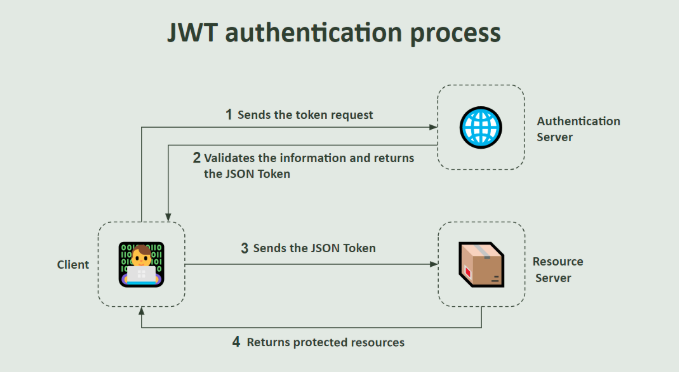
In questo articolo ho iniziato a descrivere il mio viaggio nello sviluppo di un’applicazione API .net. Gli ultimi giorni li ho passati a capire come aggiungere l’autenticazione tramite token JWT.
Non è stato semplice o meglio non riuscivo a capire il perchè dopo aver implementato tutto il necessario ricevessi l’errore “invalid_token”. Dopo qualche sessione di debug, lettura della documentazione (poca), analisi di progetti esistenti su github sono riuscito a capire dov’era il problema.
//debug token
app.Use(async (context, next) =>
{
    var token = context.Request.Headers["Authorization"].ToString();
    Console.WriteLine($"Token Received: {token}");
    var handler = new JwtSecurityTokenHandler();
    if (handler.CanReadToken(token))
    {
        var tokenRead = handler.ReadJwtToken(token);
        Console.WriteLine($"Token Header: {tokenRead.Header}");
        Console.WriteLine($"Token Payload: {tokenRead.Payload}");
    }
    else
    {
        Console.WriteLine("Invalid JWT format.");
    }
    await next();
});
Aggiungendo questo blocco di codice sono riuscito a capire dov’era l’errore.
The token needs to be in JWS or JWE Compact Serialization Format. (JWS): 'EncodedHeader.EndcodedPayload.EncodedSignature'. (JWE): 'EncodedProtectedHeader.EncodedEncryptedKey.EncodedInitializationVector.EncodedCiphertext.EncodedAuthenticationTag'.
       ---> System.MissingMethodException: Method not found: 'Byte[] Microsoft.IdentityModel.Tokens.Base64UrlEncoder.UnsafeDecode(System.ReadOnlyMemory1<Char>)'.
         at Microsoft.IdentityModel.JsonWebTokens.JsonWebToken.ReadToken(String encodedJson)
         at Microsoft.IdentityModel.JsonWebTokens.JsonWebToken..ctor(String jwtEncodedString)
         at
Il mio problema era in una non corretta configurazione delle librerie necessarie. Dopo la configurazione delle librerie necessarie il sistema ha iniziato a funzionare come previsto.
Allora passiamo a descrivere come ho aggiunto JWT all’applicazione. Pariamo dalle librerie necessarie:
dotnet add package Microsoft.AspNetCore.Authentication.JwtBearer
dotnet add package Microsoft.IdentityModel.Tokens
dotnet add package System.IdentityModel.Tokens.Jwt
Sto utilizzando .net 8 quindi le versioni corrette sono:
- Microsoft.AspNetCore.Authentication.JwtBearer (v8.x )
- Microsoft.IdentityModel.Tokens (ultima versione )
- System.IdentityModel.Tokens.Jwt (ultima versione)
Aggiungiamo la configurazione al nostro file appsettings.json. (nota bene che i dati sensibili non devono essere inseriti in appsettings.json ma in variabili d’ambiente utilizzando protezione base64).
 "Jwt": {
   "Secret": "KhavKasdajksha878943hjkdagskfgahsjfgajhsHGs!@__as#",
   "Issuer": "DevlogficaIssuer",
   "Audience": "DevlogicaAudience",
   "TokenLifetimeInMinutes": 60
 }
Per esegure l’autenticazione abbiamo bisogno di avere un ending point che ci fornisca il token attraverso un’autenticazione username/password.
Creiamo prima la classe che si occuperà dell’autenticazione.
namespace Internal.Application.Interfaces.Services
{
    public interface IAuthenticationService
    {
        AuthTokenDto Authenticate(LoginDto loginDto);
    }
}
using Internal.Application.DTOs;
using Internal.Application.Interfaces.Services;
using Internal.Application.Models;
using Microsoft.Extensions.Options;
using Microsoft.IdentityModel.Tokens;
using Microsoft.AspNetCore.Identity;
using System.IdentityModel.Tokens.Jwt;
using System.Security.Claims;
using System.Text;

namespace Application.Services
{
    public class AuthenticationService : IAuthenticationService
    {
        private readonly JwtSettings _jwtSettings;
        private readonly IPasswordHasher<User> _passwordHasher;

        // In-memory users for demonstration
        private static readonly List<User> Users = new()
        {
            new User
            {
                Id = Guid.NewGuid(),
                Email = "user@example.com",
                Username = "user",
                PasswordHash = new PasswordHasher<User>().HashPassword(null, "password") // Properly hash password
            }
        };

        public AuthenticationService(IOptions<JwtSettings> jwtSettings, IPasswordHasher<User> passwordHasher)
        {
            _jwtSettings = jwtSettings.Value ?? throw new ArgumentNullException(nameof(jwtSettings));
            _passwordHasher = passwordHasher ?? throw new ArgumentNullException(nameof(passwordHasher));
        }

        public  AuthTokenDto Authenticate(LoginDto loginDto)
        {
            var user = Users.FirstOrDefault(u => u.Email.Equals(loginDto.Email, StringComparison.OrdinalIgnoreCase));
            if (user == null)
            {
                throw new UnauthorizedAccessException("Invalid email or password.");
            }

            // Verify password
            var passwordVerificationResult = _passwordHasher.VerifyHashedPassword(user, user.PasswordHash, loginDto.Password);
            if (passwordVerificationResult != PasswordVerificationResult.Success)
            {
                throw new UnauthorizedAccessException("Invalid email or password.");
            }

            // Generate JWT
            var token = GenerateJwtToken(user);
            return new AuthTokenDto
            {
                AccessToken = token
            };
        }

        private string GenerateJwtToken(User user)
        {
            var claims = new List<Claim>
            {
                new Claim(ClaimTypes.Name, user.Username),
                new Claim(ClaimTypes.Email, user.Email),
                new Claim(ClaimTypes.NameIdentifier, user.Id.ToString())
            };

            var key = new SymmetricSecurityKey(Encoding.UTF8.GetBytes(_jwtSettings.Secret));
            var credentials = new SigningCredentials(key, SecurityAlgorithms.HmacSha256);

            var token = new JwtSecurityToken(
                issuer: _jwtSettings.Issuer,
                audience: _jwtSettings.Audience,
                claims: claims,
                expires: DateTime.UtcNow.AddHours(_jwtSettings.TokenLifetimeInMinutes),
                signingCredentials: credentials
                );

            return new JwtSecurityTokenHandler().WriteToken(token);
        }
    }
}
Ora aggiungiamo il controller per l’autenticazione. Nota bene il controller per l’autenticazione non deve essere protetto.
using Internal.Application.DTOs;
using Internal.Application.Interfaces.Services;
using Microsoft.AspNetCore.Authorization;
using Microsoft.AspNetCore.Mvc;
using System;

namespace Internal.WebApi.Controllers
{
    [Route("api/[controller]")]
    [ApiController]
    public class AuthenticationController : BaseController
    {
        private readonly IAuthenticationService _authenticationService;

        public AuthenticationController(IAuthenticationService authenticationService)
        {
            _authenticationService = authenticationService;
        }

        // POST api/authentication/login
        [HttpPost("login")]
        [AllowAnonymous] // Explicitly allow anonymous access to the login route
        public  IActionResult Login([FromBody] LoginDto loginDto)
        {
            // Check if loginDto is null or contains invalid data
            if (loginDto == null || string.IsNullOrEmpty(loginDto.Email) || string.IsNullOrEmpty(loginDto.Password))
            {
                return BadRequest(new { message = "Invalid credentials. Please provide both email and password." });
            }

            try
            {
                // Authenticate and get the JWT token
                var tokenDto =  _authenticationService.Authenticate(loginDto);

                // Return the token as part of the response
                return Ok(new { accessToken = tokenDto.AccessToken });
            }
            catch (UnauthorizedAccessException)
            {
                // Invalid credentials error handling
                return Unauthorized(new { message = "Invalid credentials" });
            }
            catch (Exception ex)
            {
                // Catch any unexpected errors and return a general error message
                return StatusCode(500, new { message = "An error occurred while processing the request", details = ex.Message });
            }
        }
    }
}
I controller ereditano da una classe base che definisce lo schema base:
using Microsoft.AspNetCore.Authorization;
using Microsoft.AspNetCore.Mvc;

namespace Internal.WebApi.Controllers
{
    [Produces("application/json")]
    [Route("api/[controller]")]
    [ApiController]
    [Authorize(AuthenticationSchemes = Microsoft.AspNetCore.Authentication.JwtBearer.JwtBearerDefaults.AuthenticationScheme)]
    public class BaseController : ControllerBase
    {

    }
}
A questo punto mettiamo tutto insieme nel program.cs
Registriamo swagger per prima cosa:
// Register Swagger with JWT configuration
builder.Services.AddSwaggerGen(c =>
{
    c.SwaggerDoc("v1", new OpenApiInfo { Title = "Internal API", Version = "v1" });

    // Add JWT Authentication to Swagger
    c.AddSecurityDefinition("Bearer", new OpenApiSecurityScheme
    {
        Name = "Authorization",
        Type = SecuritySchemeType.Http,
        Scheme = "bearer",
        BearerFormat = "JWT",
        In = ParameterLocation.Header,
        Description = "Enter 'Bearer' [space] and then your valid JWT token.\nExample: 'Bearer abc123xyz'",
    });

    c.AddSecurityRequirement(new OpenApiSecurityRequirement
    {
        {
            new OpenApiSecurityScheme
            {
                Reference = new OpenApiReference
                {
                    Type = ReferenceType.SecurityScheme,
                    Id = "Bearer"
                }
            },
            new string[] {}
        }
    });
});
Poi impostiamo JWT
// JWT configuration
var jwtSettings = builder.Configuration.GetSection("Jwt").Get<JwtSettings>();
if (string.IsNullOrEmpty(jwtSettings.Secret) || string.IsNullOrEmpty(jwtSettings.Issuer))
{
    throw new InvalidOperationException("Jwt:Key or Jwt:Issuer is missing in configuration.");
}

builder.Services.AddAuthentication(options =>
{
    options.DefaultAuthenticateScheme = JwtBearerDefaults.AuthenticationScheme;
    options.DefaultChallengeScheme = JwtBearerDefaults.AuthenticationScheme;
})
.AddJwtBearer(options =>
{
    options.TokenValidationParameters = new TokenValidationParameters
    {
        ValidateIssuer = true,
        ValidateAudience = true,
        ValidateLifetime = true,
        ValidateIssuerSigningKey = true,
        ValidIssuer = jwtSettings.Issuer,
        ValidAudience = jwtSettings.Audience,
        IssuerSigningKey = new SymmetricSecurityKey(Encoding.UTF8.GetBytes(jwtSettings.Secret))
    };
});
Impostiamo le configurazioni dell’authorization:
// Authorization configuration
builder.Services.AddAuthorization(options =>
{
    options.FallbackPolicy = new Microsoft.AspNetCore.Authorization.AuthorizationPolicyBuilder()
        .RequireAuthenticatedUser()
        .Build();
});
Infine aggiungiamo una parte che ci aiuterà nel debug in caso di problemi. Possiamo toglierla in produzione.
//debug token
app.Use(async (context, next) =>
{
    var token = context.Request.Headers["Authorization"].ToString();
    Console.WriteLine($"Token Received: {token}");
    var handler = new JwtSecurityTokenHandler();
    if (handler.CanReadToken(token))
    {
        var tokenRead = handler.ReadJwtToken(token);
        Console.WriteLine($"Token Header: {tokenRead.Header}");
        Console.WriteLine($"Token Payload: {tokenRead.Payload}");
    }
    else
    {
        Console.WriteLine("Invalid JWT format.");
    }
    await next();
});
Dopo qualche giorno di prove sono riuscito ad aggiungere JWT all’applicazione. I prossimi passi sono quelli di usare il database per la gestione utenti, aggiungere un altro ending per la gestione dei progetti, gestire le relazioni in Mongo DB. Poi passeremo all’aggiunta dei test case e al processo di pubblicazione dell’applicazione in K8s. Quindi in ordine:
- Gestione utenti tramite database MongoDB
- RBAC admin / user
- Aggiunta ending point per la gestione CRUD dei progetti
- Pipeline di pubblicazione
- K8s su Hetzner
Al termine del processo avremo le API funzionanti. Passeremo quindi alla parte di UI. A presto.